
How to Run Android on your Computer
Yes ! You heard it right. Android, the Operating System(OS) which is always thought of a mobile OS. But only few know that you can even run Android on your Computer.
Now, you would say why would someone what to run android on PC. The answers may vary from person to person such as some people just have curiosity to explore or do different things, some would say want to use android on larger screen, some people who have mobiles stuck with older android versions want to get feel of using the new android versions. Although whatever may be the reason, you can get Android on your PC without going through much trouble, and this would even give you exact idea of what to except on your phone or tablet.
Read More such Tech Tips - Technobhandar

Next, in the File System option, select FAT32.

Next, Click on the checkbox for "Create bootable disc using". Then select ISO image from the dropdown.

Click the little CD drive-looking icon next to “ISO Image” to select the Android x86 ISO file you downloaded earlier.

After the selection, it will quickly scan the file to check if everything is OK. If the download is completed properly, then no errors will occur. Now you are ready to install Android. Click o start button to start the installation.

A dialog box would appear here letting you know that the file is an ISOHybrid image, which makes it can be written one of two ways: as an ISO or DD image. Select the default and recommended method - ISO Image. Click “OK” to confirm.

One more warning will appear to let you know that everything on the drive will be erased. Click “OK” to move forward.
The installation will start, which should not take much longer. A Progress bar will be displayed to show you the status of installation. When the installation process is completed, close Rufus and remove your Drive.


Your mileage may vary with all of these things depending on drivers and whatnot, but in my experience, everything worked swimmingly.
 |
| How to run Android on your computer? |
Read More such Tech Tips - Technobhandar
Requirements-
The list of requirements is nothing special and not long, you only need to have these things-- A Computer or Laptop on which you want to run Android.
- A Pen Drive or flash drive or memory card.
- And, an active Internet Connection.
Procedure-
Step One : Prepare your Drive and Install Android
For this step you need a USB Drive or a card which should be atleast 2GB in size. Copy all the data form it (if any), because you will need to format it in this procedure. With this, you will also need a build of androidX86 project from here. I’m testing the 64-bit version of Android 6.0, but feel free to pick whichever you want. Click the “view” button to start the download—depending on your internet connection speed, this could take a bit of time to finish.

You’ll also want to download Rufus, a free Windows tool that will install Android onto the flash drive for us. Start the download parallely with the android build.
When both the files are dowloaded succesfully, launch Rufus. You may get a warning from Windows asking if you want to allow Rufus to make changes to your device—just click “Yes.”
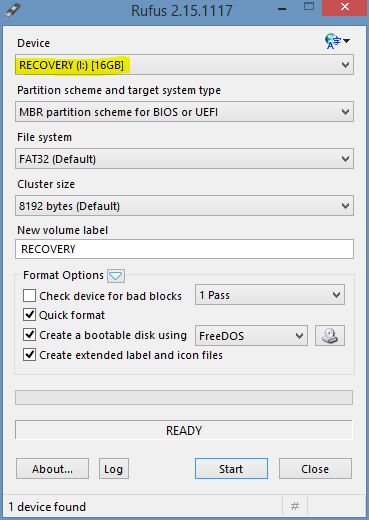
With Rufus up and running, go ahead and choose your USB drive in the device section top dropdown box. Double check the drive letter while selection to confirm you have selected the right drive, bceuase it will format the selected drive and if the selection of drive is wrong then you may end up loosing all your data on that drive.

Next, in the File System option, select FAT32.

Next, Click on the checkbox for "Create bootable disc using". Then select ISO image from the dropdown.

Click the little CD drive-looking icon next to “ISO Image” to select the Android x86 ISO file you downloaded earlier.

After the selection, it will quickly scan the file to check if everything is OK. If the download is completed properly, then no errors will occur. Now you are ready to install Android. Click o start button to start the installation.

A dialog box would appear here letting you know that the file is an ISOHybrid image, which makes it can be written one of two ways: as an ISO or DD image. Select the default and recommended method - ISO Image. Click “OK” to confirm.

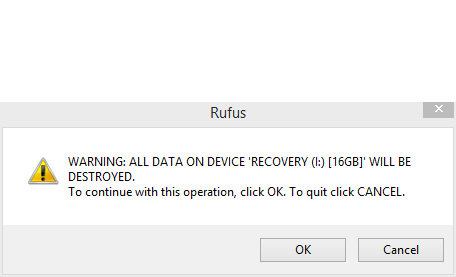
One more warning will appear to let you know that everything on the drive will be erased. Click “OK” to move forward.

The installation will start, which should not take much longer. A Progress bar will be displayed to show you the status of installation. When the installation process is completed, close Rufus and remove your Drive.

Step Two: Boot From Your USB Drive
Next, you’ll want to boot your computer from that USB drive. You may even have to alter some settings in the BIOS to do this.
Start your PC and during the booting process, press key F10 or F12 to enter the Boot Menu. (The key may vary from device to device). From the Boot Menu select your USB Device.
After this, a menu will show up asking how you’d like to run the installation: Live CD mode or Install it to the hard disk. Since we are doing this for a temporary period or for teting purposes, Select the first option "Run Android x86 without installation" OR "Android-x86 6.0-r1 Live".

Wait for a few seconds, and then you will see the Android boot animation. After few more seconds, the setup menu will appear(just like on a new Android device).

Just like setting up any other Android device, follow the instructions given on your screen and sign i with your Google account.

This is it, You have successfully installed Android on your Computer !!
Using Android on your Computer
If you’ve used Android before, you’ll find the experience to be exactly the same as a tablet or phone. The keyboard and mouse should work fine with Android, though using an operating system designed for touch with a mouse is always going to be slightly awkward. If you have a touch screen laptop, then the experience should feel much more natural.

NOTE :-
- Long-pressing works exactly the same as on a touch device: just long-click the mouse. Right clicks won’t work.
- The Windows key works as a home button—pressing it will send you right back to the home screen.
- All media keys should also work out of the box. Volume, brightness, and track controls for music were flawless on my system.
- If your laptop has a webcam, that should also work with the camera app.
- When you’re ready to exit Android, just hit your computer’s power button. The “Power Off” dialog will show up just like normal—power down, remove your USB drive, and restart the computer to get back into Windows.

Your mileage may vary with all of these things depending on drivers and whatnot, but in my experience, everything worked swimmingly.
You might also like - 5 hidden features in your Android Phone!
Check out - Android C Compiler


Post a Comment